Инсталирайте едноръкохватков душ смесител
Следвайте инструкциите за монтаж стъпка по стъпка или пуснете видеото, за да видите инсталационния процес.
Подготовка
![](http://cdn.cloud.grohe.com/Web/local_assets_4_3/service/fr_fr/08_install_single_lever_shower_mixer/4_3/960/08_install_single_lever_shower_mixer_4_3.jpg)
1 - Ако правите голям ремонт, водната мрежа трябва да бъде прочистена от всякакви замърсявания, за да избегнете повреди по смесителя.
![](http://cdn.cloud.grohe.com/Web/local_assets_4_3/service/fr_fr/install-single-lever-shower-mixer-3_4_3/4_3/960/install-single-lever-shower-mixer-3_4_3_4_3.jpg)
2 - Преди да свалите стария си смесител, се уверете, че топлата вода е отляво, а студената- отдясно. Повикайте професионалист, ако това не е така.
![](http://cdn.cloud.grohe.com/Web/local_assets_4_3/service/fr_fr/install-single-lever-shower-mixer-4_4_3/4_3/960/install-single-lever-shower-mixer-4_4_3_4_3.jpg)
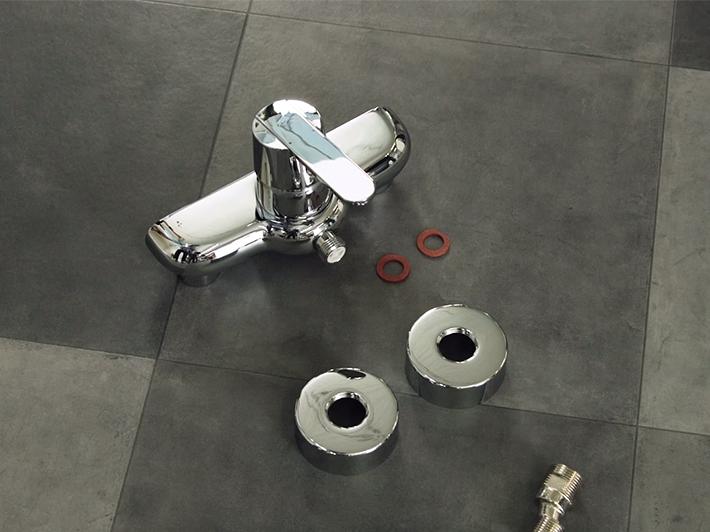
3 - Подгответе нужните части и инстументи.
Спрете водоснабдяването преди да свалите смесителя.
Подготовка
![](http://cdn.cloud.grohe.com/Web/local_assets_4_3/service/fr_fr/install-single-lever-shower-mixer-5_4_3/4_3/960/install-single-lever-shower-mixer-5_4_3_4_3.jpg)
1 - Screw the s union connectors in to your fittings in the wall so that they extend by about 42 mm.
![](http://cdn.cloud.grohe.com/Web/local_assets_4_3/service/fr_fr/install-single-lever-shower-mixer-6_4_3/4_3/960/install-single-lever-shower-mixer-6_4_3_4_3.jpg)
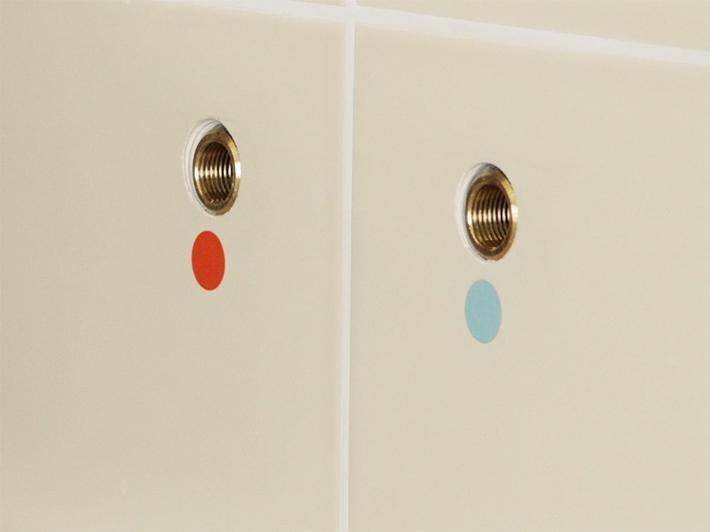
2 - Монтирайте розетките към стената.
![](http://cdn.cloud.grohe.com/Web/local_assets_4_3/service/fr_fr/install-single-lever-shower-mixer-7_4_3/4_3/960/install-single-lever-shower-mixer-7_4_3_4_3.jpg)
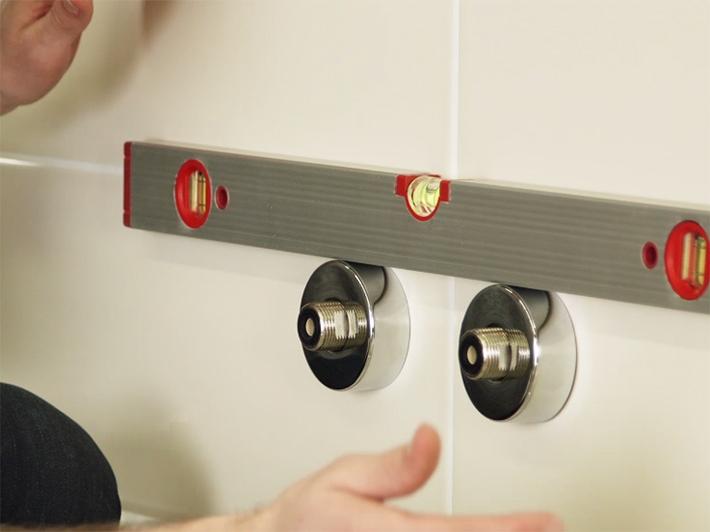
3 - Adjust the spacing so that there is 150 mm between the centres of the escutcheons, and then verify they are level . Adjust if necessary.
![](http://cdn.cloud.grohe.com/Web/local_assets_4_3/service/fr_fr/install-single-lever-shower-mixer-8_4_3/4_3/960/install-single-lever-shower-mixer-8_4_3_4_3.jpg)
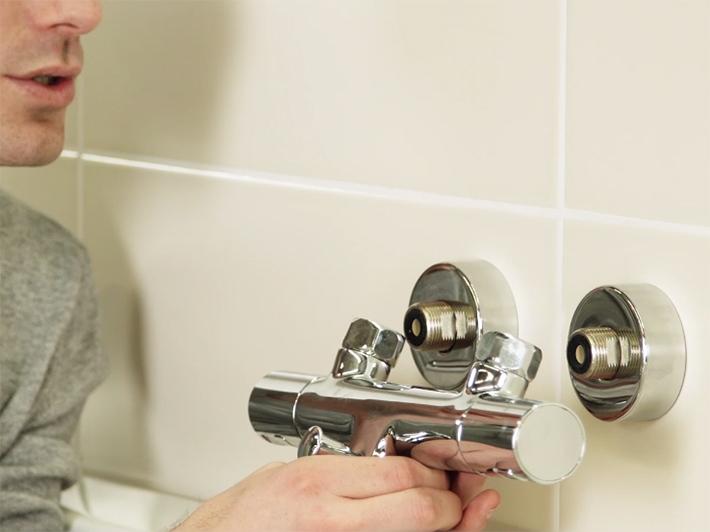
4 - Install the mixer and tighten firmly. The nuts must not touch the escutcheons. Adjust if necessary and verify horizontal positioning.
![](http://cdn.cloud.grohe.com/Web/local_assets_4_3/service/fr_fr/install-single-lever-shower-mixer-9_4_3/4_3/960/install-single-lever-shower-mixer-9_4_3_4_3.jpg)
5 - Remove the assembly. Note the depth between the s union connectors and the wall.
Инсталиране на едноръкохватковия смесител
![](http://cdn.cloud.grohe.com/Web/local_assets_4_3/service/fr_fr/install-single-lever-shower-mixer-10_4_3/4_3/960/install-single-lever-shower-mixer-10_4_3_4_3.jpg)
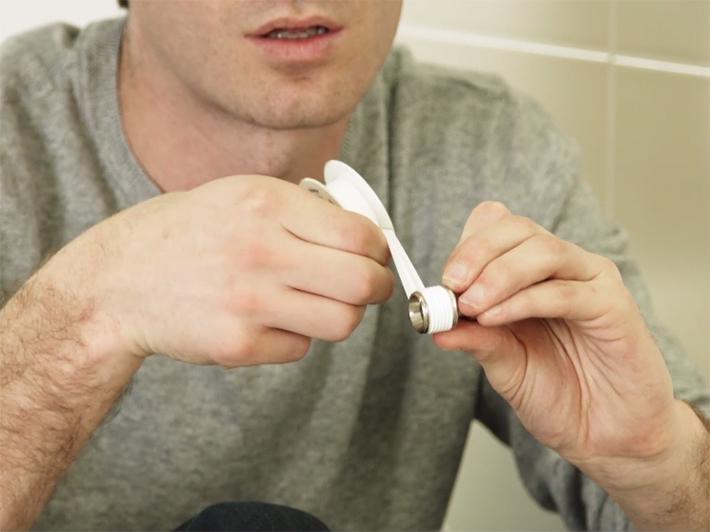
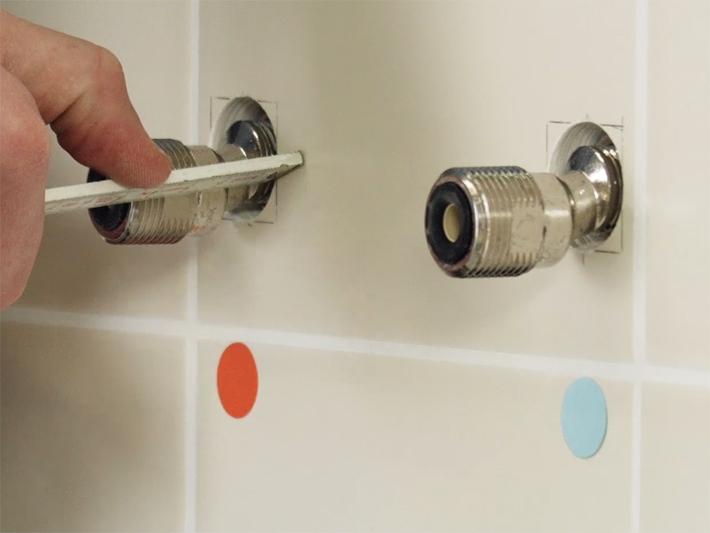
1 - Seal the thread of the s union connector using PTFE tape, wrapped in the tightening direction.
![](http://cdn.cloud.grohe.com/Web/local_assets_4_3/service/fr_fr/install-single-lever-shower-mixer-11_4_3/4_3/960/install-single-lever-shower-mixer-11_4_3_4_3.jpg)
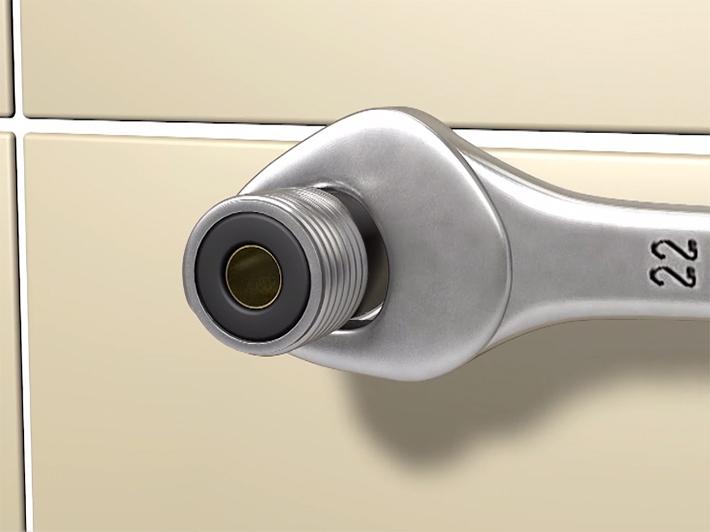
2 - Tighten the s union connectors with a 22 mm open-end wrench.
![](http://cdn.cloud.grohe.com/Web/local_assets_4_3/service/fr_fr/install-single-lever-shower-mixer-12_4_3/4_3/960/install-single-lever-shower-mixer-12_4_3_4_3.jpg)
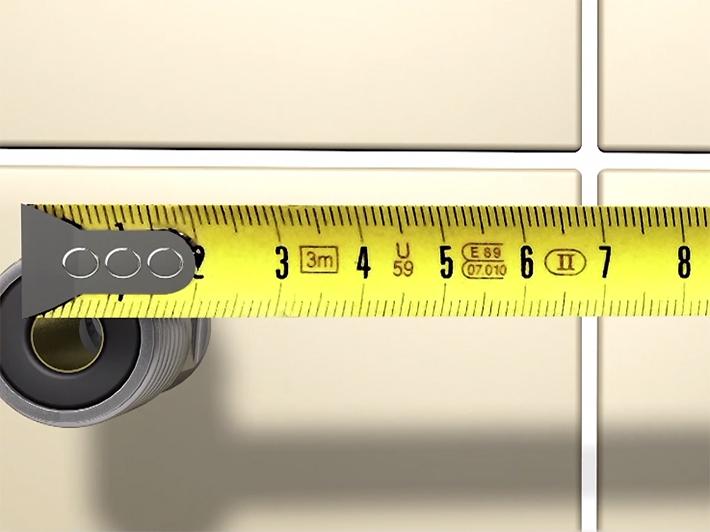
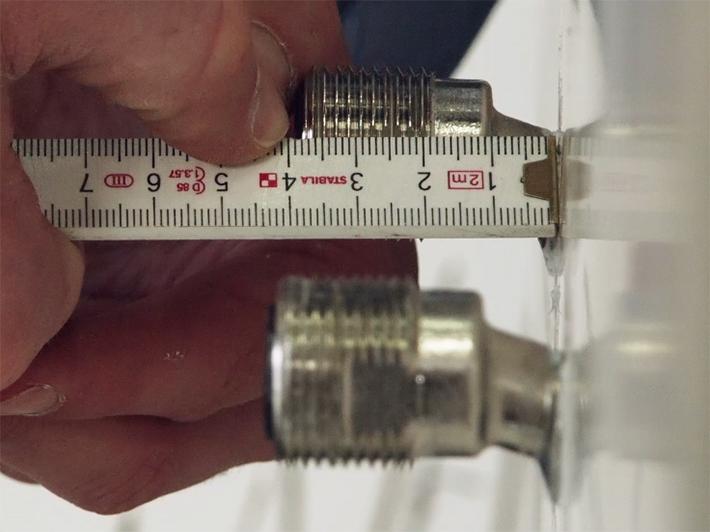
3 - Adjust the connectors so that there is a space of 150 mm centre to centre, and the same depth, as noted from your previous measurements. Then check They are level using a spirit level.
![](http://cdn.cloud.grohe.com/Web/local_assets_4_3/service/fr_fr/install-single-lever-shower-mixer-13_4_3/4_3/960/install-single-lever-shower-mixer-13_4_3_4_3.jpg)
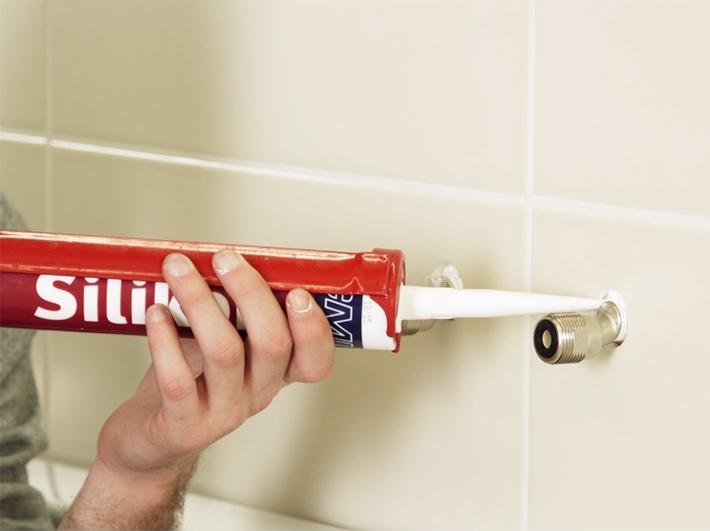
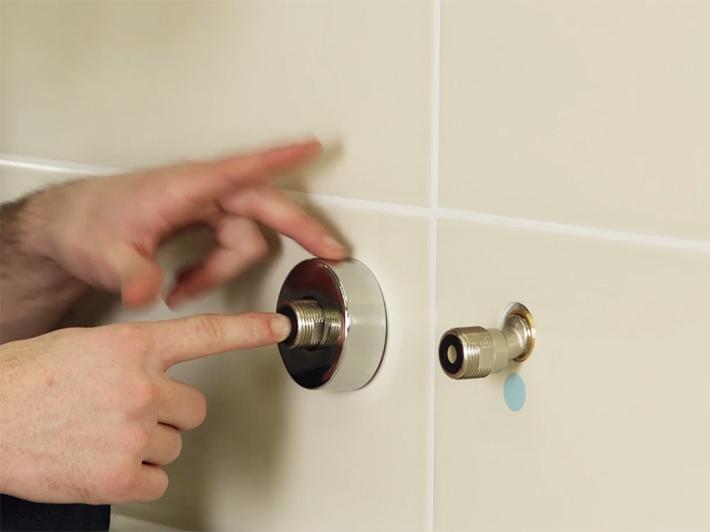
4 - Apply a silicon seal between the wall and the eccentric connectors.
![](http://cdn.cloud.grohe.com/Web/local_assets_4_3/service/fr_fr/install-single-lever-shower-mixer-14_4_3/4_3/960/install-single-lever-shower-mixer-14_4_3_4_3.jpg)
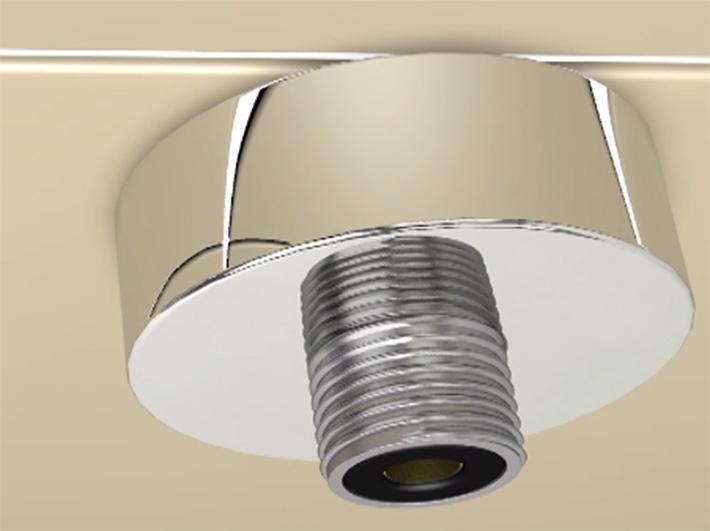
5 - Screw the escutcheons onto the s union connectors.
![](http://cdn.cloud.grohe.com/Web/local_assets_4_3/service/fr_fr/install-single-lever-shower-mixer-15_4_3/4_3/960/install-single-lever-shower-mixer-15_4_3_4_3.jpg)
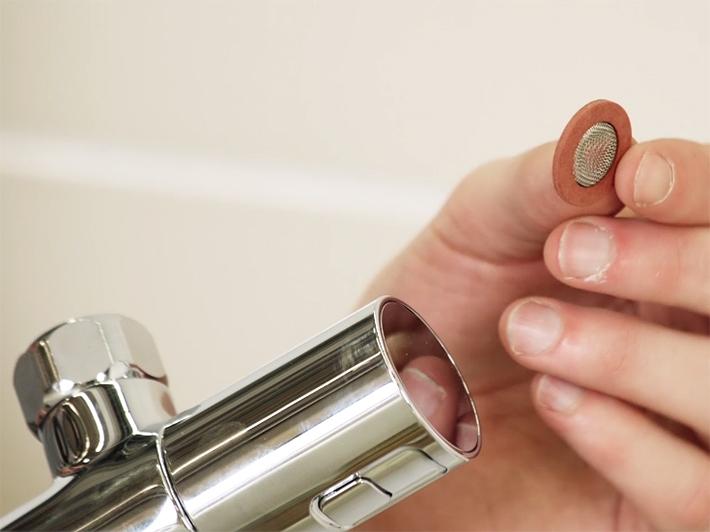
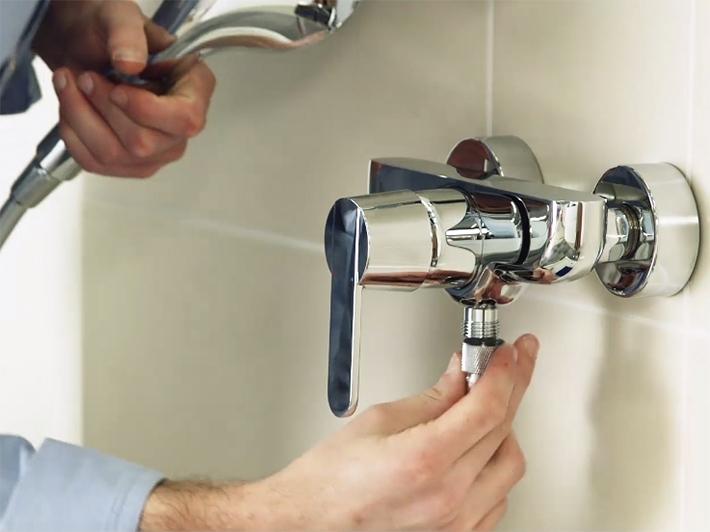
6 - Remove the red and blue caps from the mixer. Make sure the filters are placed correctly, with the rounded side facing inwards.
![](http://cdn.cloud.grohe.com/Web/local_assets_4_3/service/fr_fr/install-single-lever-shower-mixer-16_4_3/4_3/960/install-single-lever-shower-mixer-16_4_3_4_3.jpg)
7 - Place the mixer on the s union connectors, without adding any additional seals, then tighten the nuts using a 32 mm open-end wrench.
![](http://cdn.cloud.grohe.com/Web/local_assets_4_3/service/fr_fr/install-single-lever-shower-mixer-17_4_3/4_3/960/install-single-lever-shower-mixer-17_4_3_4_3.jpg)
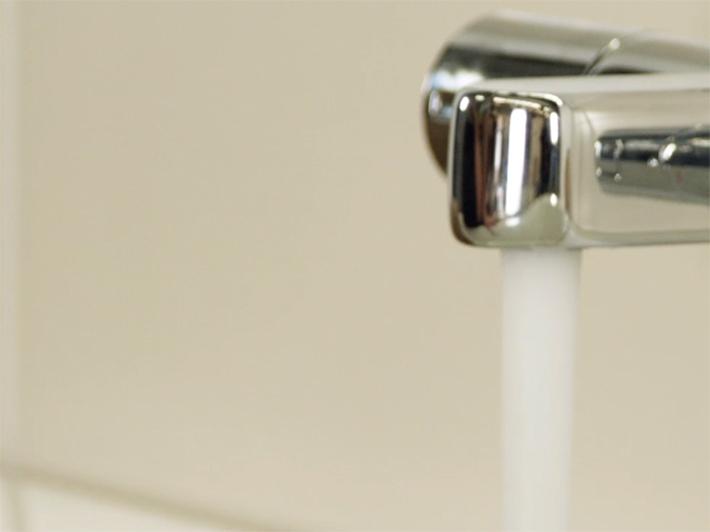
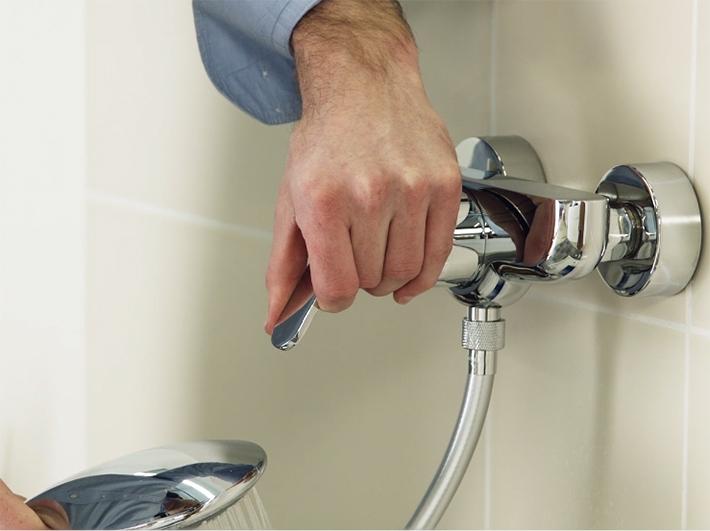
8 - Използвайте нивелир, за да се уверите, че смесителят е равен. Регулирайте го, ако е необходимо. Проверете за течове, като пуснете водното снабдяване към смесителя.
Свързване на шлауха
![](http://cdn.cloud.grohe.com/Web/local_assets_4_3/service/fr_fr/install-single-lever-shower-mixer-18_4_3/4_3/960/install-single-lever-shower-mixer-18_4_3_4_3.jpg)
Make sure the seal in the hose is in the correct position and then screw the end onto the mixer.
Пускане на водата
![](http://cdn.cloud.grohe.com/Web/local_assets_4_3/service/fr_fr/install-single-lever-shower-mixer-19_4_3/4_3/960/install-single-lever-shower-mixer-19_4_3_4_3.jpg)
Уверете се, че едноръкохватковият смесител работи правилно.
![](http://cdn.cloud.grohe.com/Web/local_assets_4_3/service/fr_fr/final_4_3/4_3/960/final_4_3_4_3.jpg)
Поздравления, готови сте с монтажа на новия си продукт GROHE. Проверете и другите инструкции за инсталация и разгледайте всички наши продукти на grohe.bg.